Add Depth to Your Woodwork: A Deep Dive into CNC 3D Relief Carving
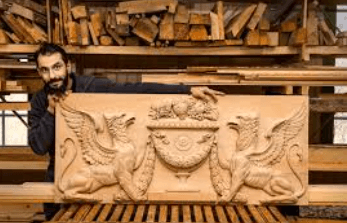
For centuries, the ultimate mark of a master woodworker was the ability to bring a flat piece of lumber to life using hand chisels, gouges, and decades of muscle memory. Creating the subtle curves of a human face, the ripples of a landscape, or the intricate details of a classic coat of arms required hundreds of hours of painstaking manual labor. One wrong strike, and the entire project was ruined.
Today, advanced workshop technology has changed the game. By blending digital artistry with mechanized precision, woodworkers can now replicate museum-quality detailing right from their home studios. If you want to break away from basic flat cutting, straight lines, and plain geometry, mastering CNC 3D relief carving is the ultimate way to elevate your craft.
What Exactly is 3D Relief Carving?
To truly appreciate this technique, it helps to distinguish it from standard CNC routing operations:
- 2D Cutting: The machine moves purely along the $X$ and $Y$ axes to cut out flat shapes (like puzzle pieces or wooden letters) at a single fixed depth.
- 2.5D Pocketing: The machine cuts to specific, stepped depths, which is ideal for standard text engraving or making recessed panels for cabinet doors.
- True 3D Relief Carving: The machine moves along all three axes ($X$, $Y$, and $Z$) simultaneously. The carving bit continuously climbs and descends fluidly over curved digital surfaces, creating organic gradients, smooth contours, and lifelike textures.
[2D Cutting] ➔ Fixed Depth ➔ Flat Profiles
[2.5D Pocketing] ➔ Stepped Depths ➔ Layered Signage
[3D Relief] ➔ Dynamic X-Y-Z Motion ➔ Organic/Sculpted Contours
Why Choose Desktop CNC for High-Depth Carpentry?
Adding intricate dimensional features to your projects completely changes their commercial value. A simple flat board might sell as a basic sign, but that same board featuring a beautifully detailed 3D mountain range can command premium gallery-level pricing.
If you are wondering whether this modern workflow fits your current shop setup, taking a look at how to leverage CNC 3D relief carving for woodworking can clarify the process. It bridges the gap between software design ($STL$ files) and tangible timber, giving you an automated assistant that works with micron-level accuracy while you focus on assembly, hand-sanding, or finishing.
The Two-Step Carving Strategy
Because 3D carving requires removing a massive amount of wood while preserving microscopic details, you cannot execute the design in a single pass. A successful 3D relief relies on a strict two-step strategy:
Phase 1: The Roughing Pass
The machine uses a large, sturdy bit (typically a 1/4-inch flat end mill) to quickly hog away the bulk of the waste wood. It leaves behind a stepped, stair-case version of your design. The goal here is speed and material removal, not surface finish.
Phase 2: The Finishing Pass
This is where the magic happens. The machine swaps to a tiny ball-nose or tapered ball-nose bit (often 1/8-inch or 1/16-inch). Moving in tiny fractions of a millimeter per line (stepover), the rounded tip glides seamlessly over the rough steps, shaving away hair-thin wood ribbons to reveal smooth, breathtaking details.
Choosing the Right Hardware for Intricate Contours
3D relief passes take time—complex designs can run for several hours as the machine makes thousands of precise, repetitive back-and-forth movements. If your machine’s frame flexes or shakes under the stress of these continuous $Z$-axis adjustments, you will get ugly line marks across your finished artwork.
For hobbyists and boutique studios looking for absolute structural rigidity without sacrificing workspace, the Two Trees TTC-450 Pro provides a highly reliable foundation.
With a rugged metal frame and a $460\text{mm} \times 460\text{mm} \times 80\text{mm}$ working envelope, this machine utilizes specialized anti-backlash drive systems to deliver a mechanical precision of $\pm0.05\text{mm}$. It ensures that your finishing pass aligns perfectly with the roughing paths, completely eliminating surface artifacts. Additionally, its offline touch display means you can transfer your massive 3D G-code files via an SD card, keeping your main computer safely away from flying wood dust.
See also: Maximizing Business Success Through Digital Marketing
Material Selection: Best Woods for 3D Carving
Not all timbers are created equal when it comes to high-detail relief work. The grain structure of your wood plays a massive role in your final finish:
| Wood Category | Best Examples | Performance in 3D Carving |
| Premium Hardwoods | Walnut, Cherry, Maple, Oak | Excellent. Dense grain structures hold crisp details flawlessly without splintering or tearing. |
| Budget Options | MDF (Medium-Density Fiberboard) | Good for practice. Carves smoothly with zero grain issues, but produces very fine, hazardous dust and lacks natural wood beauty. |
| Softwoods | Pine, Cedar, Balsa | Tricky. Loose, fibrous grains tend to fray or fuzz during fine finishing passes, requiring extensive post-carve hand-sanding. |
Final Verdict
CNC 3D relief carving removes the gatekeeping from classic woodworking. It doesn’t replace the soul of traditional carpentry; instead, it provides a powerful modern canvas for your designs. By pairing a rigid, precise platform like the TTC-450 Pro with high-quality hardwoods and clean toolpath software, you can confidently turn ordinary timber blanks into stunning dimensional masterpieces that capture the eye and demand attention.